To install rear brake pads, start by parking your vehicle on a flat surface and engaging the parking brake. Loosen the lug nuts, jack up the car, and secure it with jack stands. Remove the wheel, then slide off the brake caliper and inspect it for damage. Compress the caliper piston with a C-clamp, install new pads, and reassemble everything. Tighten lug nuts in a star pattern. Stick around to uncover deeper insights!
key Takeaways
- Prepare a clean workspace, gather tools, and park the vehicle on a flat surface with the parking brake engaged.
- Loosen lug nuts, jack up the rear wheel, secure with jack stands, and remove the wheel.
- Remove the brake drum or caliper, inspect components, and compress the caliper piston using a C-clamp.
- Install new brake pads, ensuring proper fit in the caliper bracket, and reassemble the caliper.
- Reattach the wheel, tighten lug nuts in a crisscross pattern, and test brakes for proper response.
Preparing Your Vehicle and Tools
Before you begin replacing your rear brake pads, guarantee you’ve set up a clean and stable workspace to maintain safety and efficiency during the job. Verify your clean workspace is free of clutter, and organize your tools—like socket sets, torque wrenches, and brake lubricant—for quick access.
Keep the vehicle in a well-ventilated area on a level surface, and always follow safety precautions by wearing gloves and safety glasses to protect yourself from debris or sharp edges. Additionally, ensure you park the vehicle on a flat, dry surface to prevent any movement during the repair process. Consider having a fluid bleed kit ready in case air enters the brake system during pad replacement.
Next, gather your rear brake pads and any necessary parts, and have your vehicle’s manual handy for specific guidance. Use jack stands as a critical safety measure, and double-check that the parking brake is engaged before starting any work. Using a caliper tool to retract the brake pistons will make the installation process much smoother.
Removing the Rear Wheel
Start by ensuring your vehicle is on a level surface and the parking brake is engaged for maximum safety. Begin securing the vehicle by placing wheel chocks in front of the opposite wheel to prevent rolling.
Use a lug wrench to loosen the lug nuts while the wheel is on the ground, but don’t remove them yet. Next, position a car jack under the rear frame and lift until the wheel is off the ground. Place jack stands for added support, verifying wheel stability before proceeding.
Now, fully remove the lug nuts and set them aside securely. Gently pull the wheel straight off the hub, supporting its weight, and place it in a safe spot away from your workspace. When loosening the lug nuts, follow a star pattern to ensure even torque distribution.
Accessing the Brake Components
Let’s dive into accessing the brake components now that the rear wheel is off. You’re ready to expose the drum brake system for a detailed look. Start by carefully removing the brake drum to reveal the internal parts.
Return springs keep brake components properly aligned when not engaged. Confirm you’ve relieved brake fluid pressure to prevent leaks while disconnecting hydraulic lines for wheel cylinder maintenance. Remember that the brake shoes inside the drum are crucial, as they generate friction against drums to slow the vehicle. The leading/trailing shoes configuration determines how effectively your brakes perform in both forward and reverse motion.
- Brake Shoe Check: Inspect the shoes for wear and alignment.
- Lining Assessment: Examine the brake linings for damage or uneven wear.
- Backing Plate Inspection: Verify the backing plate’s condition, ensuring it supports components properly.
- Wheel Cylinder Access: Locate the cylinder and prepare for a thorough inspection.
Take your time to handle each part with precision for a safe setup.
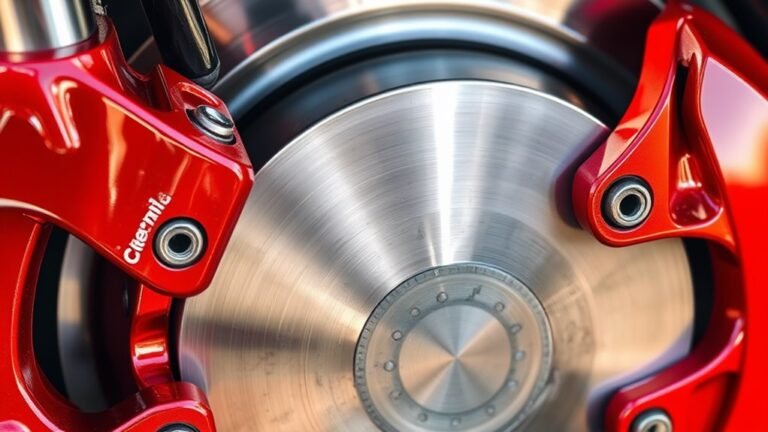
Inspecting the Caliper and Rotor
Dive right into inspecting the caliper and rotor to confirm your rear brake system operates flawlessly. Start by examining the caliper body for cracks, corrosion, or fluid leaks around the piston and bleeder screw. Check the boot condition of the caliper slide pins for tears or damage, guaranteeing they’re intact. Test the slider pin movement; they must slide freely without sticking. Verify that back plate tie bolts are torqued and secured. Pay close attention to the rubber piston seal in the caliper bore, as any damage can compromise hydraulic pressure and braking performance. Consider using brake cleaner solvent to thoroughly clean and inspect all caliper components for hidden damage.
Next, scrutinize the rotor surface for wear, warping, or scoring. Measure its thickness to verify it meets manufacturer specs, and inspect for rust or corrosion. Use a dial indicator to check runout, avoiding vibration issues. Clean off any brake dust or debris to ensure optimal performance. If rust is present on the friction surface, replace the rotor immediately to maintain safety.
Compressing the Caliper Piston
After ensuring the caliper and rotor are in good condition, move on to compressing the caliper piston to make room for the new brake pads. Start with a thorough piston condition assessment to spot any damage or wear. You’ll need to open the brake fluid reservoir cap for brake fluid replacement if levels are low, preventing pressure buildup. Alternatively, a simple screwdriver method can be used to lever the caliper and compress the piston effectively screwdriver method used. For added safety, always wear protective gloves when handling brake components. Using a 13 mm wrench will help secure the caliper slide pins during compression.
Before compressing the caliper piston for new brake pads, assess its condition for damage and ensure the brake fluid reservoir cap is open.
Here’s how to compress the piston safely:
- Use a C-clamp or caliper compressor tool for even pressure.
- Insert an old brake pad between the tool and piston to avoid damage.
- For rear calipers, rotate clockwise if required, aligning with piston grooves.
- Apply steady pressure and monitor retraction to prevent jamming.
Work meticulously, ensuring the vehicle’s secure on jack stands while wearing safety gear.
Cleaning the Brake Assembly
Before reassembling your brake system with new pads, it’s critical to thoroughly clean the brake assembly to guarantee peak performance and safety. Start by wearing gloves and goggles, then spray brake cleaner on rotors and calipers to dissolve grime. Let it sit, then scrub with a wire brush, focusing on rust and debris. Use a smaller brush for tight spots around pistons. Silicone-based lubricants are recommended for caliper pins since they won’t degrade rubber components. Cleaning is essential to prevent disc thickness variation, which can lead to uneven rotor wear and vibrations during braking disc thickness variation. Apply high-temperature grease to metal contact points on the caliper slides and pins to ensure smooth operation and reduce brake noise. Check the brake fluid condition for contamination, as dirty fluid can affect performance. During cleaning, conduct a brake pad wear inspection to confirm the old pads’ condition and identify uneven wear patterns. Rinse components with water, ensuring no residue remains. Dry thoroughly with microfiber cloths to prevent rust, preparing the assembly for the next steps.
Installing New Brake Pads
Now that you’ve thoroughly cleaned the brake assembly, it’s time to move on to installing the new brake pads. This step is essential to ensure ideal brake performance and address any brake performance concerns. With precision, you’ll set up the new pads for long-lasting function and safety. Make sure to compress the caliper piston fully using a tool to create enough space for the new pads. The tension tab orientation is crucial for proper brake pad clip installation and noise prevention. Always check the torque specifications when securing brake components during installation.
- Align the pads: Position the new pads against the rotor, ensuring perfect alignment for even wear.
- Install clips: Apply anti-seize or brake grease to clips for smooth pad movement and effective pad wear monitoring.
- Check dimensions: Confirm the pads fit snugly in the caliper brackets without spacers.
- Secure with clamps: Use retaining clamps if your vehicle requires them for stability.
Follow these steps meticulously for a flawless installation.
Reassembling the Caliper
While the new brake pads are in place, it’s imperative to focus on reassembling the caliper with meticulous attention to detail. Start by reinserting the pistons into their sleeves, ensuring precise alignment. Perform seal replacement by installing new seals to prevent leaks, making sure they’re not twisted. Using a brake caliper compressor tool provides more even pressure distribution than traditional methods.
Reinstall retaining rings with circlip pliers for a secure fit, and align caliper pins for smooth operation. Apply specialized brake lubricant to pins and piston sleeves, avoiding excess to prevent contamination. Additionally, use a c-clamp to carefully press the piston back into place for proper seating use c-clamp. If the caliper shows signs of sticking, thoroughly clean the slider pin grooves to prevent binding.
Before final assembly, inspect all components for cleanliness and proper fit. Check piston movement for seamless operation. Remember, brake fluid flushing may be necessary if contamination is suspected, ensuring a clean system for excellent performance during operation.
Reattaching the Wheel
After completing the caliper reassembly, turn your attention to reattaching the wheel with precision and care. Guarantee the vehicle is on a level surface, supported by jack stands, and follow safety protocols. Focus on wheel alignment by aligning the wheel with the hub bolts, then hand-tighten the lug nuts to seat it properly against the hub. Remember, changing brake pads yourself saves time and money as highlighted in vehicle maintenance tips. Having proper safety gear is essential when working on brake components. Ensuring you have a lug wrench ready is critical for this final stage of brake pad replacement.
When reattaching the wheel after caliper reassembly, ensure precision by aligning it with hub bolts and hand-tightening lug nuts for a secure fit.
Here’s how to secure it with lug nut tightening:
- Use a tire iron to initially snug the lug nuts with even pressure.
- Employ a torque wrench to meet the manufacturer’s torque specifications.
- Follow a crisscross pattern for balanced lug nut tightening.
- Double-check each nut to confirm wheel stability.
Once lowered using the jack, remove the stands, verifying the vehicle’s secure before proceeding.
Testing the Brakes After Installation
Having secured the wheel back onto the hub with proper torque, turn your focus to verifying the functionality of your newly installed rear brake pads. Start by pressing the brake pedal to check for a consistent brake pedal response. A spongy feel might indicate air in the lines, requiring proper brake system bleeding using a bleeding kit. The friction material composition plays a crucial role in brake performance and heat dissipation during operation.
Listen for unusual noises like squealing during a low-speed test drive in a safe area. Guarantee the vehicle stops evenly without pulling to one side, confirming balanced installation. Inspect the dashboard for brake warning lights, and verify all hardware is secure with a wrench. While quality brake pads can last up to 80,000 miles under optimal conditions, this varies by usage. Additionally, remember that brake wear depends on various factors like driving conditions brake wear variables. If issues persist, like brake drag or pulsating, consult a professional for precise diagnostics and adjustments.